 Adaptor Microsoft Loopback merupakan alat uji untuk lingkungan jaringan virtual di mana akses jaringan tidak tersedia. Dan lagi, Anda harus menggunakan adaptor Loopback jika terdapat konflik dengan adaptor jaringan atau dengan driver adaptor jaringan. Anda bisa menyetujui klien jaringan, protokol, dan item konfigurasi jaringan lainnya untuk adaptor Loopback, dan Anda bisa menginstal driver adaptor jaringan atau adaptor jaringan yang lebih tinggi saat menyimpan informasi konfigurasi jaringan. Anda juga menginstal adaptor Loopback selama proses instalasi tanpa pengawasan.
Instalasi manual
Untuk menginstal secara manual adaptor Microsoft Loopback di Windows XP, ikuti langkah-langkah ini:
(Karena rata-rata Windows XP yang kita instal dalam bahasa inggris, maka step by step-nya juga disusun dengan bahasa inggris)
-
From the Start menu, select Control Panel.
-
Double-click Add Hardware to start the Add Hardware wizard.
-
On the Welcome screen, click Next.
-
On the Is the hardware connected? screen, select Yes, I have already connected the hardware, and click Next.
-
On the The following hardware is already installed on your computer screen, select Add a new hardware device, and click Next.
-
On the The wizard can help you install other hardware screen, select Install the hardware that I manually select from a list, and click Next.
-
From the list, select the type of hardware you are installing screen, select Network adapters, and click Next.
-
On the Select Network Adapter screen, make the following selections:
-
Manufacturer: select Microsoft.
-
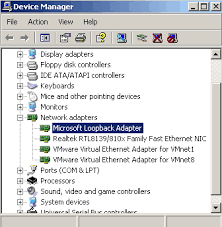
Network Adapter: select Microsoft Loopback Adapter.
-
-
Click Next.
-
On the The wizard is ready to install your hardware screen, click Next.
-
On the Completing the Add Hardware Wizard screen, click Finish.
-
If you are using Windows 2003, restart your computer.
-
Right-click My Network Places on the desktop and choose Properties. This displays the Network Connections control panel.
-
Right-click the connection that was just created. This is usually named "Local Area Connection 2". Choose Properties.
-
On the General tab, select Internet Protocol (TCP/IP), and click Properties.
-
In the Properties dialog, do the following:
-
IP Address: Enter a non-routable IP for the loopback adapter. Oracle recommends the following non-routable addresses:
-
192.168.x.x(xis any value between 1 and 255) -
10.10.10.10
-
-
Subnet mask: Enter
255.255.255.0. -
Leave all other fields empty.
-
Click OK.
-
-
Click OK.
-
Click OK in the Local Area Connection 2 Properties dialog.
-
Restart the computer.
-
Add a line to the
C:\windows\system32\drivers\etc\hostsfile with the following format, after thelocalhostline:IP_address hostname.domainname hostname
where:
-
IP_addressis the non-routable IP address you entered in step 16. -
hostnameis the name of the computer. -
domainnameis the name of the domain.
For example:
10.10.10.10 mycomputer.mydomain.com mycomputer
-
-
Check the network configuration:
-
Open System Properties, and select the Computer Name tab. In Full computer name, make sure you see the hostname and the domain name.
-
Click Change. In Computer name, you should see the hostname, and in Full computer name, you should see the hostname and domain name.
-
Click More. In Primary DNS suffix of this computer, you should see the domain name.
-
Catatan Secara default, properti TCP/IP dikonfigurasi untuk menggunakan DHCP.
Bagaimana mudah bukan ? Selamat mencoba
No comments:
Post a Comment